Discussion forum for the various methods and structures used for getting an early start on your growing season, extending it for several weeks or even year 'round.
|
 |
|
|
Thread Tools | Display Modes |
 December 24, 2015
|
#31 | |
|
Tomatovillian

Join Date: Feb 2006
Location: Den of Drunken Fools
Posts: 38,539
|
Quote:
 In the trade it is called field bending and done correctly there will be no links. Worth |
|

|

|
|
December 24, 2015
|
#32 |
|
Tomatovillian

Join Date: Feb 2012
Location: Newfoundland, Canada
Posts: 6,793
|
I had my eye on some 1/2 inch metal conduit going for $5 for a 10 foot length. I figured this would make a decent height of hoop for determinate tomatoes and squash - for a single row. I've been warned that the cover has to come off in winter, or the snow load will just mash up this weight of metal here. I'd like to design some modular units that can be joined in a longer row and then taken apart and stacked in a shed for winter.
Thought about doing part plastic and part row cover - maybe find an optimal cover for the climate here. Re: squash bug, Scott you should check out the thread on parthenocarpic squash. It would be fantastic to ID the varieties that will reliably make fruit without pollination, for places where you want to keep that cover in place for pest control. And or when it's just too cool for pollinators. (well, I can dream!  ) )
|
|
|
|
|
December 24, 2015
|
#33 | |
|
Tomatovillian
Join Date: Feb 2006
Location: Den of Drunken Fools
Posts: 38,539
|
Quote:
The make three different kinds EMT IMT and Rigid oh and Plasti Bond. EMT is all you need. Here it sells for around $1.99 each and you should be able to get it in the 100 foot bundles for less. Worth |
|
|
|
|
|
December 24, 2015
|
#34 |
|
Tomatovillian

Join Date: Jun 2012
Location: Illinois, zone 6
Posts: 8,407
|
I'm thinking if I run a piece of conduit lengthwise on top as a purlin bar, I can save money by wiring the two conduit pieces together, instead of buying the clamps.
|
|
|
|
|
December 24, 2015
|
#35 | |
|
Tomatovillian
Join Date: Feb 2012
Location: Newfoundland, Canada
Posts: 6,793
|
Quote:
Worth, everything is more expensive here due to the cost of shipping. And don't forget, our dollar has lost a lot of value too. The only tough material that's really affordable is the spruce rails you cut yourself or the rocks you dug out of the ground. A strong person who has lots to eat can do it and make something from nothing. |
|
|
|
|
|
December 24, 2015
|
#36 |
|
Tomatovillian
Join Date: Feb 2006
Location: Den of Drunken Fools
Posts: 38,539
|
Carriage bolts is the way to go.
# 10-24 or 1/4 should do the job nicely. Drill the hole the right size and the square part will force it's way into the conduit and make a square hole. Nothing sticking out to hurt the plastic sheet. 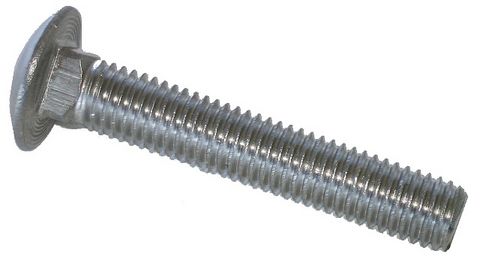
Last edited by Worth1; December 24, 2015 at 05:35 PM. |
|
|
|
|
December 24, 2015
|
#37 |
|
Tomatovillian
Join Date: Jun 2012
Location: Illinois, zone 6
Posts: 8,407
|
That was my second choice. I would go with the 3/4" if I drilled and bolted it. I was a little worried about the bolt heads on the plastic. I can cover them with white duct tape, but the sun eats it up after a few months.
ah, wait, if I just use the right bolts the head is round, I see. |
|
|
|
|
December 24, 2015
|
#38 | |
|
Tomatovillian
Join Date: Feb 2006
Location: Den of Drunken Fools
Posts: 38,539
|
Quote:
The nut and washer go on the outside.  Worth |
|
|
|
|
|
December 24, 2015
|
#39 | |
|
Tomatovillian
Join Date: Feb 2012
Location: Newfoundland, Canada
Posts: 6,793
|
Quote:
 
|
|
|
|
|
|
December 24, 2015
|
#40 | |
|
Tomatovillian
Join Date: Feb 2006
Location: Den of Drunken Fools
Posts: 38,539
|
Quote:
Worth |
|
|
|
|
|
December 24, 2015
|
#41 |
|
Tomatovillian

Join Date: May 2013
Location: New Mexico
Posts: 2,052
|
I've used 1 1/4" hose clamps but the carriage bolts look to be a cheaper and better way.
|
|
|
|
|
December 24, 2015
|
#42 | |
|
Tomatovillian
Join Date: Feb 2012
Location: Newfoundland, Canada
Posts: 6,793
|
Quote:
 Var (fir) is a different story. Gone in no time. The spruce is dense and the resins preserve it. Var (fir) is a different story. Gone in no time. The spruce is dense and the resins preserve it.Still I doubt I could clean up rails good enough to not destroy greenhouse pastic - or row cover, for that matter. Too bad! |
|
|
|
|
|
December 24, 2015
|
#43 |
|
Tomatovillian

Join Date: Nov 2011
Location: ohio
Posts: 4,350
|
Honestly... go with real greenhouse products. they are designed for that and will hold up way better and be cheaper in the long run... they are more convenient to get your structure together and will not bend and flex or deteriorate like other products will. Everything is uv stable, galvanized so there isn't rust and designed so there aren't pieces sticking up that you are needing to cover so you aren't ruining the plastic. When you need to dismantle it it comes apart and you can put it back together easier than the "jigsaw puzzle" you rigged trying to do it cheaper. The greenhouse plastic lasts at least 4 years unless you ruin it with a knife or some other sharp object. What is your time worth? sometimes spending a little more costs less in the long run.
__________________
carolyn k |
|
|
|
|
December 25, 2015
|
#44 |
|
Tomatovillian

Join Date: Feb 2013
Location: France
Posts: 554
|
Heres another suggestion, cheap and versatile :
I bought strong galvanized wire, cut lengths and bent them into half circles to make tunnels 10 high and 15wide plus 7 on each end to be buried into the ground. They are big enough for one row of lettuce. For several rows or bigger plants the size is different : 2 feet high and 3 feet wide. I tie their tops together with a string to keep them vertical. I buy plastic wide enough to cover the wires plus 8 on each side that I load with bamboos, sticks etc. kept in place with stones. I never care about overheating under a strong sun, Ive never had any bad surprises ! |
|
|
|
|
December 25, 2015
|
#45 |
|
Tomatovillian
Join Date: Feb 2012
Location: Newfoundland, Canada
Posts: 6,793
|
For lettuce and other crops up to 2 ft tall my friends at the farm don't use any supports. Row cover is laid over the bed and all the edges are buried in the soil as well as anchored with rocks. Burying the edges is the way to use it for pest control - caterpillars and also flea beetles, rust fly on carrot and parsnip etc. The plants just push up the row cover as they grow.
You have to take the cover off for weeding or thinning, and then put it back in place with buried edges. But this works really well for pest control and gives a great head start on the season. I think there is improved germination too for direct seeded crops, because of the moisture retention under cover. For squash they use some short lengths of black plastic pipe as low hoops, with the ends dug into the soil. The hoops are not even joined to one another so they do flop down a bit. But they are enough to give the squash the head space that they need to push their way up without breakage. Again the edges are buried under. When it's time to pollinate the squash they remove the cover but leave the hoops for easy cover in case of a frost. This wouldn't work for tomatoes, I reckon, because even Cole's determinates will need some support. And I think tomatoes would also benefit from extra head space and less contact between the cover and the leaves. |
|
|
|
|
| Thread Tools | |
| Display Modes | |
|
|


 View Public Profile
 Find More Posts by Worth1

 Linear Mode

