Share your favorite photos with us here. Instructions on how to post them can be found in the first post within.
|
 |
|
|
Thread Tools | Display Modes |
 July 15, 2013
|
#1 |
|
Tomatovillian
Join Date: Feb 2010
Location: Merced, CA
Posts: 832
|
Hi,
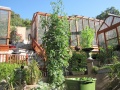
Six (long or short - I can't decide LOL!) weeks ago, I posted a photo taken June 2 of the framework I'd put up over two of my elevated beds/salad tables on the patio. I FINALLY pretty much finished things up today!! I still have to tweek stuff here and there, replace my drip irrigation, etc. but it's good to go for my fall prep projects - starting the fall tomatoes, doing some rooting, and maybe starting some cooler weather crops. Tomorrow, I'm going to start rooting some growing tips from my current crop of tomatoes that I need to top. Like everything I build these days, it's pretty crude but workable ("if it's square, I ain't there"  )! It's pretty much constructed entirely out of materials I had on hand. I'd come to sort of a screeching halt on the project wondering how I'd do the doors when our back yard neighbor decided to replace the old redwood fence between our yards, and I was able to score some nice fence boards and 2x4's. I mustered the courage to set up my old 10" circular bench saw (which I hadn't used in about 8 years!) to cut the wood to size. I think I spent about $50 on some fiberglass window screening for the doors and one end, plus some screws, cable ties, and other misc. stuff. )! It's pretty much constructed entirely out of materials I had on hand. I'd come to sort of a screeching halt on the project wondering how I'd do the doors when our back yard neighbor decided to replace the old redwood fence between our yards, and I was able to score some nice fence boards and 2x4's. I mustered the courage to set up my old 10" circular bench saw (which I hadn't used in about 8 years!) to cut the wood to size. I think I spent about $50 on some fiberglass window screening for the doors and one end, plus some screws, cable ties, and other misc. stuff.Anyway, I'm attaching the photo I'd posted earlier of the framework, plus some new photos of the screen house. As time goes on and the weather changes I'll probably adapt the coverings to turn it into a mini-greenhouse. Right now it's just a shade house and kitty kat exclusion zone. I also threw in a recent photo looking down a row of the regular garden towards the new fence the neighbors put up. Anne |

|

|
|
July 15, 2013
|
#2 |
|
Tomatovillian
Join Date: Dec 2011
Location: San Diego
Posts: 321
|
Anne -
That looks great! And didn't I read that you're also in a wheelchair? How did you do all this work? Did you get some help? Pretty amazing and good job!! Lyn |
|
|
|
|
July 16, 2013
|
#3 |
|
Tomatovillian
Join Date: Nov 2011
Location: Long Island NY
Posts: 1,992
|
Anne,
Inspiringly creative as usual! |
|
|
|
|
July 16, 2013
|
#4 |
|
Tomatovillian

Join Date: Apr 2013
Location: Southlake, TX
Posts: 743
|
The mini greenhouse looks great! And I love the Tibetan prayer flags you have in the garden

|
|
|
|
|
July 16, 2013
|
#5 |
|
Tomatovillian

Join Date: Apr 2012
Location: asdf
Posts: 1,202
|
MacGyver Green house
|
|
|
|
|
July 16, 2013
|
#6 |
|
Tomatovillian

Join Date: Feb 2006
Location: Den of Drunken Fools
Posts: 38,539
|
Are those Tibetan prayer flags?
It seems as though I am seeing this more often. My neighbors down the street have them strung up all over the yard.  Worth |
|
|
|
|
July 16, 2013
|
#7 |
|
Tomatovillian
Join Date: May 2013
Location: MA 6a/b
Posts: 352
|
Anne, Thats a great greenhouse. I am planning to make my own in next few years. I will bookmark this thread.
Do you have another thread talking about the design? (Are those PVC pipes? what plastic did you use to cover the greenhouse, what are the dimensions .. etc) |
|
|
|
|
July 16, 2013
|
#8 |
|
Tomatovillian
Join Date: Feb 2010
Location: Merced, CA
Posts: 832
|
Hi Everyone,
Thanks for all the nice comments! Yes those are Tibetan Prayer Flags - glad you liked them, Vespertino and cool about your neighbors, Worth . They were a gift from a friend who goes to Bhutan a few times a year. She brought me some dried Bhutanese peppers from one trip that I was able to take seeds from and sprout - should ask her to try and get some mater seeds for me next trip!Yes, Lyn, I'm pretty much wheelchair bound, but can use the walker for short distances and stand for a while. My (also disabled) brother might have helped a bit, holding something in place while I attached a fastener or marked for a saw cut, etc., but otherwise I made it without help. Since I design as I go, and spend a lot of time just thinking things out, and work very slowly, I think any help just would have irritated me LOL!! I came up with a sort of scaffolding arrangement to use in reaching the high portions of the structure that I've attached a couple of photos of. It's basically a sliding dog ramp I had (slides from 4' to 8' long) clamped to my garden cart with the sides removed. Have a step/stool chair on top so I can sit down for a bit after brief periods of standing. I have some steps I built a while ago that the end of the ramp rests on and that I use to "climp up to" the ramp. Works great! (I also modified a step stool to make a sort of mini-step ladder with shorter distances between the steps so I could use it). Tnkner, I don't have complete plans - just plans for the salad table portions of the structure that I'll try to post later. I sort of build "organically" designing as I go and depending on what materials I have at hand. The whole thing is based on some old wooden framed window screens I salvaged from our old house in San Jose when we moved here about 5 years ago. I had the 1/2" PVC pipes left over from another project with my regular raised beds and the thought occurred to me that I could use them to build the shade house. The covering is the old repurposed shade cloths I had left over from when I had them over the individual beds. (Had those supported with hoops of cut up hula hoops which fit the 2' span of the beds). The shade cloth is just the standard stuff that Orchard Supply Hardware out here carries. As I mentioned, the door window screen and end screens on one side are fiberglass window screen material. Screening is attached to the hoops with cable ties. The doorway openings are 3' wide x 6' tall, beds are about 2' wide each, and overall dimensions are 8' wide, 6' long, and 6'10" tall. BTW, I repaired the original window screens from the San Jose house and just replaced them in the shade house to form lower shelves on each side under the growing boxes. Now, I need to get going on filling the structure with plants  ! !Anne |
|
|
|
|
July 16, 2013
|
#9 |
|
Tomatovillian

Join Date: Jan 2006
Location: Northern Minnesota - zone 3
Posts: 3,220
|
I am so impressed with your project and your can-do attitude. Where there is a will, there is a way! Great idea for a convertible screen-to-greenhouse to span the seasons. Are we going to be treated to pictures of the cats which are to be excluded? Or don't they belong to you?
 Lovely garden, and interesting trellis system, looks like you can lower the vines for picking? Lovely garden, and interesting trellis system, looks like you can lower the vines for picking?
__________________
Dee ************** |
|
|
|
|
July 17, 2013
|
#10 |
|
Tomatovillian
Join Date: Apr 2012
Location: asdf
Posts: 1,202
|
seeeeeeee, totally a MacGyver relative
|
|
|
|
|
July 17, 2013
|
#11 |
|
Tomatovillian
Join Date: Feb 2010
Location: Merced, CA
Posts: 832
|
Crans,
LOL about MacGyver! I guess it's sort of true - although I never did watch that show (maybe caught one episode). I had to get up very early for work at that time so I didn't watch much tv. BTW, I urge anyone who might be tempted to replicate my "handicapped scaffolding" to use great caution with (or avoid altogether) the sliding dog ramp portion. It's only supposed to be for pet use. I'm comfortable with it as I only weigh about 95 lbs (and a lot of dogs weigh more than that!!), but I'd be very hesitant to use it if I weighed more than, say, a St Bernard <g>. And even for myself, if I had it stretched out to the full 8' length, I would put some sort of support at the halfway point. Oh, I was rereading my post describing the scaffolding and noticed a typo, I'd missed before. I was describing the step portion and wrote to "climp" up rather than to "climb" up - "climp" seems more appropriate actually ddsack, Thanks for the nice comments. There is only one cat who is a visitor only (and I hope it stays that way LOL). During construction of the shade house, she was very intrigued by the elevated bed and seemed to be planning on using it as a (to use my brother's term) "kitty crapper." Hopefully I've thwarted her plans..... I can't really lower my tomatoes with the set up I have, but I can reach high enough with the aid of my step-stool if necessary, and I'm topping off the plants before they get TOO tall. (The plants are getting so heavy they're starting to snap some of the trellis string!). tnkrer, I'm attaching a pdf (that you'll probably have to enlarge to 200%) of the plans I made for the salad tables. The dimensions are based around my old window screens (shown in another photo attached) that were about 2' x 6' (a little less). The bottom of the "salad box" has 1/2" wire mesh hardware cloth stapled to the sides. The box is then lined with weedblock to let the water drain out but the soil to stay in. The box rests on one of my old San Jose window screens (as shown in the photo). If you're doing things from scratch, you can, obviously do any dimensions you want. But the pdf and photo should give you a better idea of things. (And, of course, you don't need to use the old wooden window screens!) ------------------------------------------------------------- I've started to "fill my shade house with plants" and have enclosed some photos of some tomato cuttings and tiny seedlings I have going - now in the shade house. I decided that it was maybe a bit too bright still for the new cuttings and baby seedlings their first time outside, so I attached some mesh rubber shelving material to one corner to provide a bit more shade for now. I used diatomaceous earth, which is a lot finer than the potting soil I had been using, so I used some of my leftover fiberglass window screen to line the bottom of my 10 oz planting cups so that the DE wouldn't just drain out the holes. (Holes made with a fine tipped soldering iron, BTW). I threw in a photo of that, just because I had one  . .Finally, just for the heck of it - a photo of today's harvest. I have to pick a little underripe due to all the critters in the garden that like to eat ripe ones. I've been getting 5-10 lbs a day for quite a while now. Freezer's about full of them, so looks like I'm in for another big canning day soon! |
|
|
|
|
July 21, 2013
|
#12 |
|
Tomatovillian
Join Date: Feb 2010
Location: Merced, CA
Posts: 832
|
Hi,
As I'd mentioned, the mini-greenhouse/shade house is not quite complete - esp. in regards to making it kitty-proof !Anne |
|
|
|
|
July 23, 2013
|
#13 |
|
Tomatovillian
Join Date: Apr 2012
Location: asdf
Posts: 1,202
|
HA! Cat thinks its human.
|
|
|
|
|
July 25, 2013
|
#14 |
|
Tomatovillian
Join Date: May 2013
Location: MA 6a/b
Posts: 352
|
Hi Anne,
Thanks for providing more details and the plans .. (Life is conspiring to keep me away from gardening (and this site) for last few days. So I haven't had time to browse the site and thank you earlier ) |
|
|
|
|
July 25, 2013
|
#15 |
|
Tomatovillian

Join Date: May 2013
Location: Summerfield, FL
Posts: 197
|
Your cat thinks you make that for him, new bed?!
|
|
|
|
|
|
|


 View Public Profile
 Find More Posts by aclum
 Visit LDx4's homepage!
 Linear Mode

