Have a great invention to help with gardening? Are you the self-reliant type that prefers Building It Yourself vs. buying it? Share and discuss your ideas and projects with other members.
|
 |
|
|
Thread Tools | Display Modes |
 January 16, 2014
|
#1 |
|
Tomatovillian

Join Date: Feb 2006
Location: Den of Drunken Fools
Posts: 38,539
|
Just so you know what one looks like here is a picture of a real one something like I used to run.
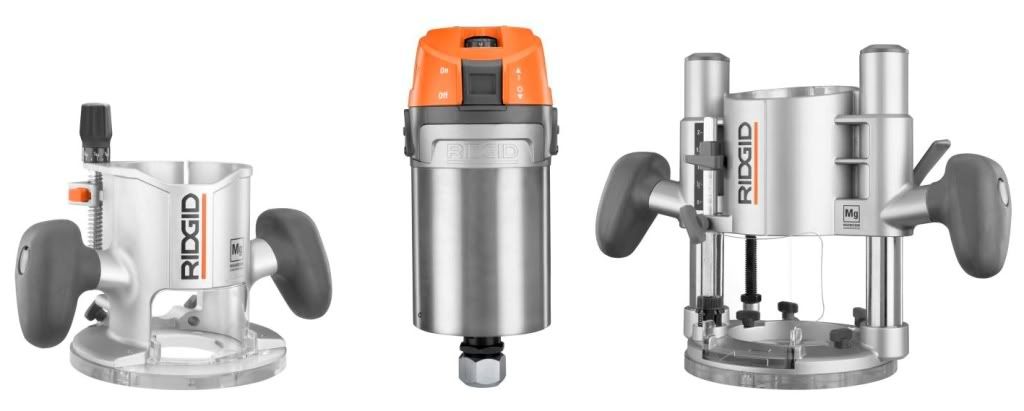
 I cant afford one of these they cost thousands of dollars. I also dont care for router tables. Besides you can do many things with this you cant or it would be hard to do with one. What I have came up with is to convert my drill press into one. Right below where the depth stop gauge is attached there is enough of the shaft left to attach a split collar. I hope this attachment comes out. Pin router holding fixture 2.jpg The router is 2 Hp and has a round body. The drill press has a tilting table that will tilt from side to side and from back to front. doing this and if I could make the fixture to hold the router and it to the round shaft I could have a milling machine for wood. Any ideas on this fixture I would have to have made or make myself. Any thoughts or ideas would be appreciated. worth |

|

|
|
January 17, 2014
|
#2 |
|
Tomatovillian

Join Date: Oct 2011
Location: Durhamville,NY
Posts: 2,706
|
I'm not sure how your router is built, but I had one that the depth adjusted by turning the base on threads on the body. If yours is built that way it may be possible to screw the base on upside down. That would give you a better surface to attach to. If yours isn't built that way forget the suggestion.
One other wild idea any chance of attaching a rod to the router that you could just insert into the chuck. |
|
|
|
|
January 17, 2014
|
#3 |
|
Tomatovillian

Join Date: Sep 2012
Location: Oklahoma
Posts: 4,488
|
I need a picture of your drill press, depending on what type you have I may have an idea.
__________________
Scott AKA The Redbaron "Permaculture is a philosophy of working with, rather than against nature; of protracted & thoughtful observation rather than protracted & thoughtless labour; & of looking at plants & animals in all their functions, rather than treating any area as a single-product system." Bill Mollison co-founder of permaculture |
|
|
|
|
January 17, 2014
|
#4 |
|
Tomatovillian
Join Date: Feb 2006
Location: Den of Drunken Fools
Posts: 38,539
|
Last edited by Worth1; January 17, 2014 at 10:45 AM. |
|
|
|
|
January 17, 2014
|
#5 |
|
Tomatovillian
Join Date: Feb 2006
Location: Den of Drunken Fools
Posts: 38,539
|
In the second picture you will see where the depth gauge is attached.
This is where I would like to mount the bracket. The quill is MT 2 taper and the chuck is Jacobs 3 taper. This is what they look like taken apart. The chuck goes on the short side. 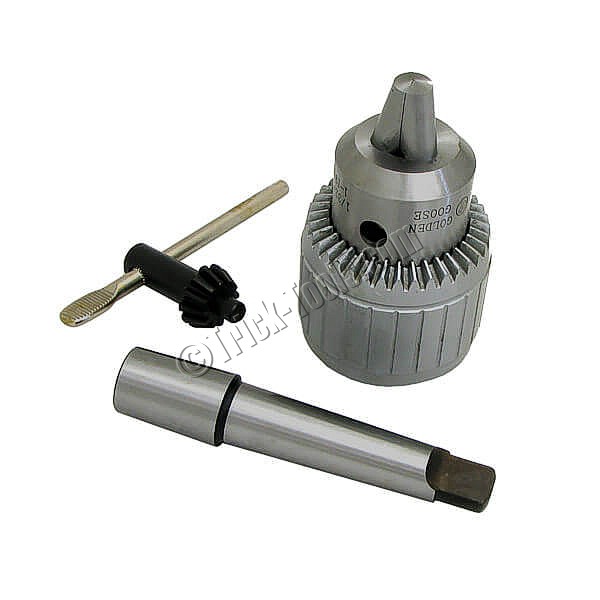 Any side thrust on these tapers will cause them to come out eventually. The last thing I need is for the router to fall out running 20.000 RPM.  I have two routers one has a threaded body but only 1/4 shaft. It is an old 1982 craftsman and hard to set up I just keep a rabbiting bit in it. Again thank you. Worth |
|
|
|
|
January 17, 2014
|
#6 |
|
Tomatovillian

Join Date: Apr 2013
Location: Pilot Hill, Ca.
Posts: 307
|
You take great pictures!
 That's an ambitious undertaking. I think if it were me, I'd take a close look at the Seig X1 Micro Mill. Not sure how big your projects will be. It's not very expensive being small and being from China. Is there anything that isn't on YouTube? Here is someone using it on wood: http://www.youtube.com/watch?v=2_l3mweld3s
__________________
-Dennis Audios, Tomatoville. Posted my final post and time to move on. |
|
|
|
|
January 17, 2014
|
#7 | |
|
Tomatovillian
Join Date: Feb 2006
Location: Den of Drunken Fools
Posts: 38,539
|
Quote:
It isnt out of the question. One thing I am going to do is mount a degree wheel on the table raising handle. I happen to have one handy. The thread pitch on the machine is 4 threads per inch. With one rotation of the crank it will raise or lower the table 1/4 of an inch. If you put the degree wheel on you would be able to know exactly where you were from were you was. Stupid and not really needed but I thought it would be cool. Worth 
|
|
|
|
|
|
January 17, 2014
|
#8 |
|
Tomatovillian
Join Date: Sep 2012
Location: Oklahoma
Posts: 4,488
|
If I am seeing that correctly I think I have a solution. Will take some welding and machine work though. You need to make a bracket that has a split collar the same size as your guide has but deeper and with 3 "tabs" and one arm similar to your guide arm.
You need to make another collar sized to your router core with 3 tabs as well, that match the three tabs you made for the press bracket. Drill the press bracket arm exactly like the guide arm and the 3 press bracket tabs for bolts. Drill and tap the router bracket tabs to line up with the press bracket you made. Now you have 2 brackets with collars to replace the 2 parts you will remove from the press and the router respectively. To swap them out, take off the chuck and the compression collar from the press and replace it with the new bracket you made and tighten. Remove the router core from the handle housing and install it in the other bracket you made. Line up the tabs and securely bolt the two brackets together. Plug the router in and Bingo, you now have a homemade pin router. Might I suggest though? Maybe try and find an old table router instead? One made for routing artwork for the old lead type printing presses? Much more elegant and useful because you can clamp the wood to the table and do your woodworking artwork by moving the table router. Those things were built to last forever. You should be able to find one used since news papers no longer use them.
__________________
Scott AKA The Redbaron "Permaculture is a philosophy of working with, rather than against nature; of protracted & thoughtful observation rather than protracted & thoughtless labour; & of looking at plants & animals in all their functions, rather than treating any area as a single-product system." Bill Mollison co-founder of permaculture Last edited by Redbaron; January 17, 2014 at 10:09 PM. |
|
|
|
|
January 17, 2014
|
#9 |
|
Tomatovillian
Join Date: Feb 2006
Location: Den of Drunken Fools
Posts: 38,539
|
Scott I am trying to digest all of that.
What I did do is install the degree wheel while I was out and set up and zeroed a dial indicator. I rotated the handle exactly 90 degrees and took a reading. The indicator moved .0615 which is .001 off of 1/16 of an inch, it is coarse threads on the press so you cant expect too much .  What the degree wheel does do is magnify the movement on the handle. Scott I dont have a lathe or milling machine, I do have a Miller Tig welder. worth |
|
|
|
|
January 17, 2014
|
#10 |
|
Tomatovillian
Join Date: Feb 2006
Location: Den of Drunken Fools
Posts: 38,539
|
For what its worth I found a gear site and they have a sample template maker.
You inter how many gear teeth and how far apart and you can print the template out. My depth gauge on the press has a threaded rod that has 20 threads per inch. One revolution of the depth adjusting nut equals .050 of an inch. I know this because a micrometer has 40 thread per inch thread pitch. One revolution equals .025 of an inch. So I needed a wheel with 50 evenly divided marks on it. A 2 inch wheel was made the printed out template was glued on the wheel and I made the marks. The wheel was installed in the depth gauge and the dial indicator was set up. I moved the wheel 5 marks and the dial indicator moved .005. Now I am going to use part of Scott's idea since it finally dawned on me what he was saying. The tab thing had me confused. You need the welder to install the tabs that would put the two piece fixture together. ( Right?) What I wont do is remove the depth gauge there is enough room for both the be there. The beauty of the pin router is the different sized pins you install in the middle of the table. You put your work on a pattern and let the pattern run on the pin. You can also put a rotary table and X Y table on it and cut circles or index where holes go and much more. Thank you Scott.  Worth |
|
|
|
|
January 17, 2014
|
#11 | |
|
Tomatovillian
Join Date: Sep 2012
Location: Oklahoma
Posts: 4,488
|
Quote:
The degree wheel set up you made is brilliant and will be completely unaffected. Sounds like all you need to do there is make a chart.
__________________
Scott AKA The Redbaron "Permaculture is a philosophy of working with, rather than against nature; of protracted & thoughtful observation rather than protracted & thoughtless labour; & of looking at plants & animals in all their functions, rather than treating any area as a single-product system." Bill Mollison co-founder of permaculture |
|
|
|
|
|
January 18, 2014
|
#12 | |
|
Tomatovillian
Join Date: Sep 2012
Location: Oklahoma
Posts: 4,488
|
Quote:
__________________
Scott AKA The Redbaron "Permaculture is a philosophy of working with, rather than against nature; of protracted & thoughtful observation rather than protracted & thoughtless labour; & of looking at plants & animals in all their functions, rather than treating any area as a single-product system." Bill Mollison co-founder of permaculture |
|
|
|
|
|
January 18, 2014
|
#13 |
|
Tomatovillian
Join Date: Feb 2006
Location: Den of Drunken Fools
Posts: 38,539
|
In case you are interested here is the link ti the gear generator.
http://woodgears.ca/gear_cutting/template.html And the guys website he also has some cool videos. http://www.google.com/url?sa=t&rct=j...59568121,d.cWc Worth |
|
|
|
|
January 19, 2014
|
#14 |
|
Tomatovillian
Join Date: Feb 2006
Location: Den of Drunken Fools
Posts: 38,539
|
I found everything need.
I have a small metal yard in a shed on the back of my place. I found some heavy gauge 4'' 2 1/2 and 3" pipe and a lot of thick steel plate. All I need to do is cut out what I need and then cut out slits of the right width and polish it up. I will have the collars for the router and the press. I also have the equipment to thread anything I need. Worth |
|
|
|
|
January 19, 2014
|
#15 |
|
Tomatovillian
Join Date: Apr 2013
Location: Pilot Hill, Ca.
Posts: 307
|
So all you have to do is cut that thick steel plate, huh? My arm falls off every time I have to do that, not having a plasma cutter or metal band saw.

__________________
-Dennis Audios, Tomatoville. Posted my final post and time to move on. |
|
|
|
|
|
|


 View Public Profile
 Find More Posts by Worth1
 Visit Redbaron's homepage!
 Linear Mode

