New to growing your own tomatoes? This is the forum to learn the successful techniques used by seasoned tomato growers. Questions are welcome, too.
|
 |
|
|
Thread Tools | Display Modes |
 March 6, 2013
|
#106 | |
|
Tomatovillian

Join Date: Mar 2011
Location: Raleigh, NC
Posts: 1,448
|
If I was growing plants to maturity as opposed to starting seedlings for a few weeks to a month I might agree. Cool white as the most inexpensive option work perfectly fine for starting plants. I've never personally done a well controlled experiment to test this though!
 pdf attached. Quote:
__________________
Blog: chriskafer.wordpress.com Ignorance more frequently begets knowledge: it is those who know little, and not those who know much, who so positively assert that this or that problem will never be solved by science. --Charles Darwin |
|

|

|
|
March 6, 2013
|
#107 | |
|
Tomatovillian
Join Date: Jun 2006
Location: central NJ z6/7
Posts: 73
|
Quote:
I do not quite understand how you are getting the correlation of color temperature and wavelength. A fluorescent bulb is not a black body so Wien's law does not necessarily apply. As far as I know, a typical cool white triphosphor fluorescent bulb (spectrum attached) does not emit any significant light in the region that you show in your graph for a cool white (around 700 nm). On a separate note, red light in the 600-680 nm region is extremely efficient for foliage growth in terms of photosynthesis (PAR), at least that is my understanding from what I have read. However, red and blue light also interacts with photoreceptors that regulate plant growth and flowering but that is not the same thing as PAR (Photosynthetically Active Radiation). Your graph appears to have mixed together those two different things, PAR and photoreceptors: http://en.wikipedia.org/wiki/Phytochrome http://en.wikipedia.org/wiki/Cryptochrome Last edited by artis; March 6, 2013 at 09:44 PM. |
|
|
|
|
|
March 11, 2013
|
#108 |
|
Tomatovillian

Join Date: Dec 2012
Location: NEPA
Posts: 17
|
I changed my setup a bit since the last picture. I added another shelf and and 3 T8 lights shelf. I also purchase a 4 ft. heat mat with a thermometer.
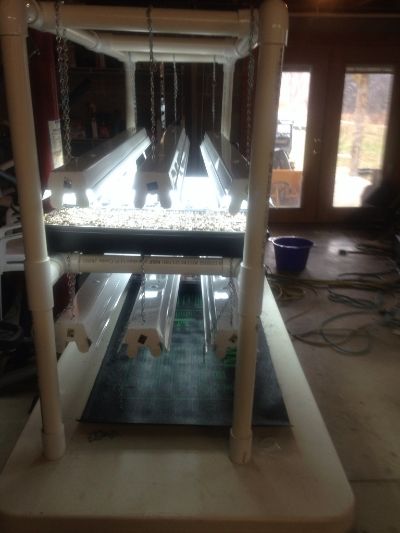
Last edited by Wds83; March 11, 2013 at 04:01 PM. |
|
|
|
|
March 11, 2013
|
#109 | |
|
Tomatovillian
Join Date: Mar 2011
Location: Raleigh, NC
Posts: 1,448
|
Looks good. I have a PVC setup that is similar that I use for the orchids over the winter.
Quote:
__________________
Blog: chriskafer.wordpress.com Ignorance more frequently begets knowledge: it is those who know little, and not those who know much, who so positively assert that this or that problem will never be solved by science. --Charles Darwin |
|
|
|
|
|
March 11, 2013
|
#110 |
|
Tomatovillian
Join Date: Mar 2011
Location: Raleigh, NC
Posts: 1,448
|
Here is what I came up with. A rack system from Sam's and some shop-lights I've had for several years plus a 4 light fixture obtained via craigslist for $10. This gives me a work area for potting and plenty of shelves for the plants as they grow. I'll add more lights as I find them and also convert the T12 to T8 ballasts.
__________________
Blog: chriskafer.wordpress.com Ignorance more frequently begets knowledge: it is those who know little, and not those who know much, who so positively assert that this or that problem will never be solved by science. --Charles Darwin |
|
|
|
|
March 12, 2013
|
#111 | |
|
Tomatovillian

Join Date: Jul 2010
Location: NY Zone 5b/6a
Posts: 546
|
Quote:
Charlie |
|
|
|
|
|
March 12, 2013
|
#112 | |
|
Tomatovillian
Join Date: Mar 2011
Location: Raleigh, NC
Posts: 1,448
|
I'm happy with it so far and the plants appear to be as well.
I did notice that the T8 ballasts have a significantly differently wiring diagram than the original T12. One side is fairly straightforward but what I'm a little confused on is the jumpered side. Is there a difference in instant start wiring? (I've also read something about overdriving bulbs) Here is the diagram on the T8 ballast: One blue ballast wire is connected to both red fixture wires the blue ballast wire other is connected to both blue fixture wires: On the other side the white, blue and yellow fixture wires are all connected to the single red ballast wire? Is this jumpered correctly? Quote:
__________________
Blog: chriskafer.wordpress.com Ignorance more frequently begets knowledge: it is those who know little, and not those who know much, who so positively assert that this or that problem will never be solved by science. --Charles Darwin |
|
|
|
|
|
March 12, 2013
|
#113 |
|
Tomatovillian

Join Date: Jun 2010
Location: Cheektowaga, NY
Posts: 2,466
|
Your old T12 used a Rapid Start Ballast, the wiring is more complicated with the red, blue, yellow and white wires. Your new Instant Start Ballast wiring is much simpler, only 2 blue wires and one red. Doing the conversion can look confusing reusing the old wires.
There's an easier way of doing the conversion that will eliminate the need for all those confusing colored wires, joints and wire nuts. each tombstone has 4 push in connectors (2 or each pin). On the side for the red wire, make a short jumper wire and short across the pin contacts on each tombstone. Make another jumper wire and connect across to each tombstone. That will leave you with one available push in connector on each tombstone, connect the red wire from the ballast to one of them. If you need to remove a wire from a tombstone, use a light pulling and twisting motion until the wire pops out of the connector. You don't want to get too aggressive with that because you could break off a wire inside the connector.  On the blue side, make a short jumper wire and short across the pins on each tombstone. Remove any unneeded wires because all you have to do now is connect each blue wire from the ballast to each tombstone. You're done wiring the ballast to the tombstones! No joints and wire nuts needed. The only joints you will need is on the line side. |
|
|
|
|
March 12, 2013
|
#114 |
|
Tomatovillian
Join Date: Mar 2011
Location: Raleigh, NC
Posts: 1,448
|
Thanks Ray. Those wires are a complete PITA to remove. I twisted and pulled on one for 5 min (pretty aggressively!) and it barely budged. I think I'd rather reuse the existing with some wire nuts...just have to figure out the puzzle!
For all that work it might just be more economical to buy new fixtures. I'm looking at the wiring in my pictures and trying to follow the electrical circuit, isn't connecting them all like I show the same electrical circuit as the jumpers you show? In my picture, there is an across tombstone white jumper, then the other white wire to yellow is a short across tombstone one and same white to blue is a short across tombstone two. The only thing missing in the picture is the red ballast wire which would be connected with a wirenut to the other 3. Or am I completely out in electrical left field? Same on the other side, isn't connecting them as shown the same circuit as you describe? I will also take apart a new T8 light I have to see how it's wired.
__________________
Blog: chriskafer.wordpress.com Ignorance more frequently begets knowledge: it is those who know little, and not those who know much, who so positively assert that this or that problem will never be solved by science. --Charles Darwin Last edited by ChrisK; March 12, 2013 at 11:14 PM. |
|
|
|
|
March 13, 2013
|
#115 |
|
Tomatovillian
Join Date: Jun 2010
Location: Cheektowaga, NY
Posts: 2,466
|
Chris, It looks like everything is connected together OK.
|
|
|
|
|
March 13, 2013
|
#116 |
|
Tomatovillian
Join Date: Jul 2010
Location: NY Zone 5b/6a
Posts: 546
|
Chris, I'm sorry I couldn't get back to you sooner, but it looks like Ray has addressed your concerns about the wiring diagram and has explained the process. It's pretty straightforward.
I too, had problems removing some of the wires from the tombstones, and went with (porcelain) wire nuts on one fixture...not as neat, but works just as well. Charlie |
|
|
|
|
March 13, 2013
|
#117 | |
|
Tomatovillian
Join Date: Jul 2010
Location: NY Zone 5b/6a
Posts: 546
|
Quote:
Charlie |
|
|
|
|
|
March 13, 2013
|
#118 |
|
Tomatovillian

Join Date: Jun 2009
Location: Snellville, GA
Posts: 346
|
Put them under lights a soon as they germinate, about 2-3" above them.
__________________
Ken |
|
|
|
|
March 13, 2013
|
#119 | |
|
Tomatovillian
Join Date: Jun 2010
Location: Cheektowaga, NY
Posts: 2,466
|
Quote:
|
|
|
|
|
|
March 13, 2013
|
#120 | |
|
Tomatovillian
Join Date: Mar 2011
Location: Raleigh, NC
Posts: 1,448
|
Thanks! Glad my eyes weren't deceiving me!
Now I need to get a good deal on a case of 10 ballasts. Quote:
__________________
Blog: chriskafer.wordpress.com Ignorance more frequently begets knowledge: it is those who know little, and not those who know much, who so positively assert that this or that problem will never be solved by science. --Charles Darwin |
|
|
|
|
|
|
|


 View Public Profile
 Visit ChrisK's homepage!
 Find More Posts by ChrisK
 Linear Mode

